
Welcome to your Condo Partner dashboard. This guide walks through every part of the page — what each section shows, why it matters, and how to use it together to keep track of your commission. Tap any topic below to jump straight to it.
Your account is a property management company account: a book of units you manage, in as many buildings as you look after. Everything else in this guide applies to you exactly as written — the same dashboard, the same rooms table, the same reports, welcome sheets, tour passes and gift cards. This section covers what only you do.
Every unit's code is random — eight characters, like 4F7A2C9E — on purpose: there is no pattern to guess, so nobody can work out one unit's code from another's. There is nothing to choose. Your dashboard, the room key legend and every report show which unit a code belongs to, and the 14-day discount cards your guests put on their phones use random codes of their own.
Press Add a unit above your rooms. You choose the property, give the unit number, the owner's first and last name and their own email address, where that unit's commission goes, and the strata office contact for the building. The form stays open after each unit and keeps the property and the office contact, so the next unit in the same building takes seconds.
If the property is not on the list, the last option in the property dropdown is My property isn't on this list — add it. That turns the same form into a short questionnaire about the property, including whether its strata runs a rental pool. We review it, add it — usually the same day — and email you when you can add its units.
A unit is never enrolled on one party's word. The owner confirms, by email, that they own it and that your company manages it and its account. We confirm with the strata or management office ourselves — we make that call; you never have to ask the office for permission on our behalf. Giving us the office contact when you add the unit is what makes it quick.
While a unit is waiting on either of those, it sits in Units on their way in above your rooms, with its stage showing. Once both are in, its code and QR are built and it moves into Your rooms with everything else. The unit's QR is on its welcome sheet, which you print from the rooms table.
Per unit, you choose: into your own account with us, where you see what every unit earned and what has been paid out and you settle with the owner directly on your own terms — or straight to the owner's account, with the reporting still coming to you. The decision is yours and your policy with that owner; we suggest you agree it with them before you add the unit.
The owner is not asked where the commission should go and is not given a choice of it. Their form confirms ownership and awareness only. Section 26 of the terms sets out that the arrangement between you and the owner is yours alone, that we are not a party to it and have no affiliation with your company, and that how often an owner receives reporting is arranged with you rather than with us.
The rest of this guide is yours as written. In particular: Your rooms and the room pages (sections 9 and 10) cover the welcome sheet, the custom report and the printed report; tour passes (section 12) are a free local tour for a guest staying in one of your units; and the room key legend is the printable list of every unit's code for your front desk, where you can also add your own reference against a unit.
If you would rather be walked through those on the screen itself, press 🚀 Dashboard onboarding at the top of your dashboard. It is a list of short walkthroughs — your units, unit owners, your money, the welcome sheet and room key, reports, tour passes — that ticks off as you go and remembers where you stopped.
Every unit has its own page with its orders, its commission by month, and two ways to report on any period: a shareable report — a web page on its own link, emailed to your office at the same time and live for seven days — and a printed report for statements and records. Section 10 of this guide walks through both, and they are how you keep an owner informed at whatever rhythm the two of you have agreed.
Every figure on your dashboard comes from one simple cycle: a guest buys commissionable products (wines, spirits, and other selected items) with one of your room codes, you earn commission on those items, it lands in your wallet, and you spend it. Each part of the page is just a different view of that same cycle.
So one order ripples across the whole page — the summary cards show your running totals, the Cashflow chart shows the month-to-month rhythm, the Recent activity feed lists every individual movement, and the room charts and table show which rooms drove it. Click into any room to see the same story for that one unit.
A quick tour runs the first time you sign in, walking you through each part of the dashboard. Tick Don't show this again if you'd rather not see it, or reopen it any time from the Take a tour button. Room pages have their own tour too.
Each complex has its own private login. Enter the username and password we provided. Your session stays active for about 8 hours, after which you'll simply log in again.
Directly under the account header sits Contact & account details — everything we hold to reach you: the account contact (name, email, phone, building address), the on-island contact, your building, and the account's type, tier and code prefix. A room's own page shows the same details.
To change something: press Edit, change what needs changing, then Save. Nothing changes on a click, so nothing is changed by accident. You can edit the contact name, the phone number, the building address, and the on-island contact's name, phone and relationship.
The email address is fixed — for you and for us. It is the identity key in Shopify, UpPromote and CreditsYard, the three systems that hold your commission and your discount codes, so a change there is arranged with the team rather than typed. If it ever needs to change, tell us.
The purple banner at the top shows your complex name and address, and on the right your Current Balance — the store credit you have available to spend right now.
A small badge shows your account status: ✓ Account balanced means everything reconciles. If it reads reconciliation in progress, we're simply squaring up the books — nothing for you to do.

The row of cards summarizes your account. Each card has its title at the top and the figure below:
All figures are shown in KYD.

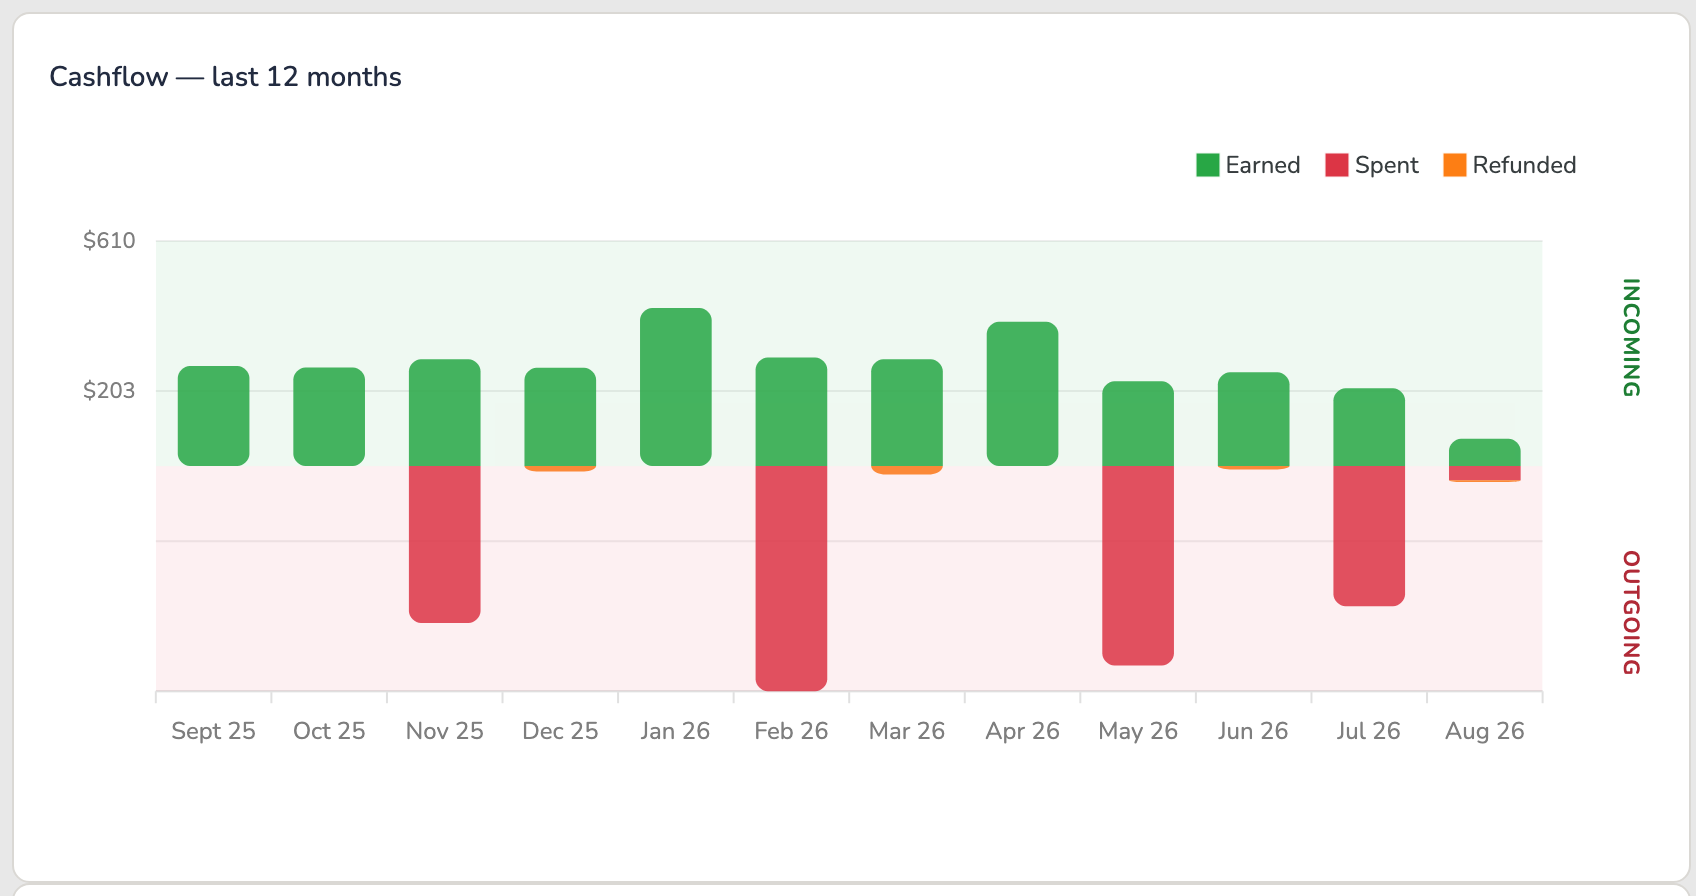
This chart shows money in versus money out each month. Green bars above the line (Incoming) are commission you earned. Red and orange bars below the line (Outgoing) are credit you redeemed and any refund clawbacks.
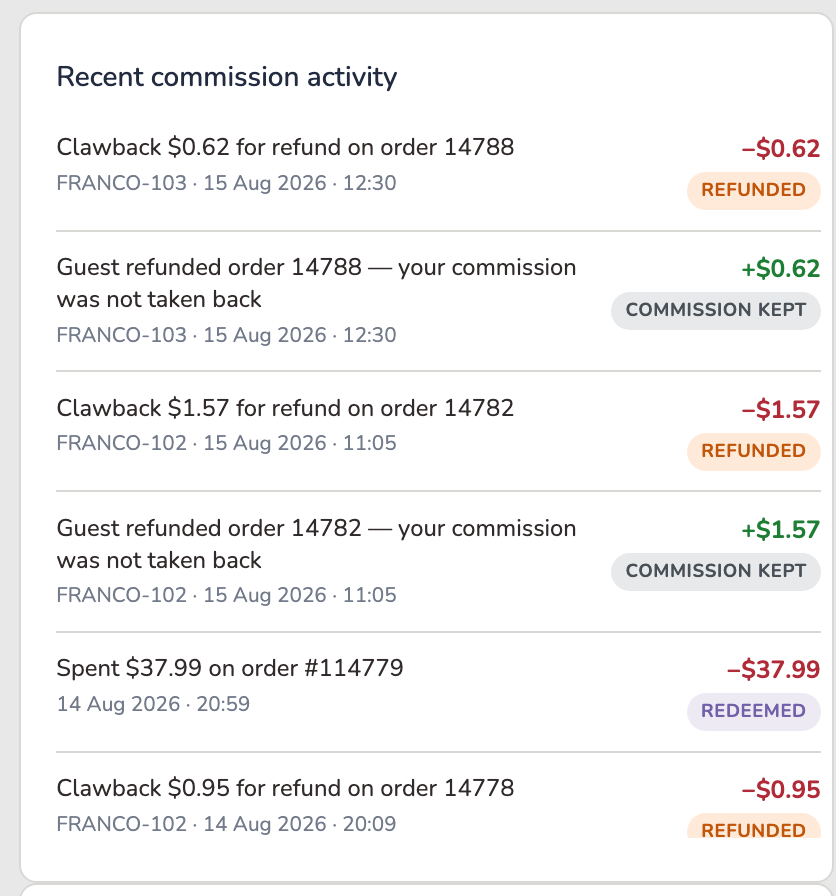
A running log of every transaction on your account — earnings, redemptions and refunds — with the newest at the top. Each entry has a colored status tag and the amount: + for money in, − for money out.
Every entry is one of four things, and the tag tells you which:
| EARNED | Money in. A guest used your room code, and your 5% has been paid into your wallet. |
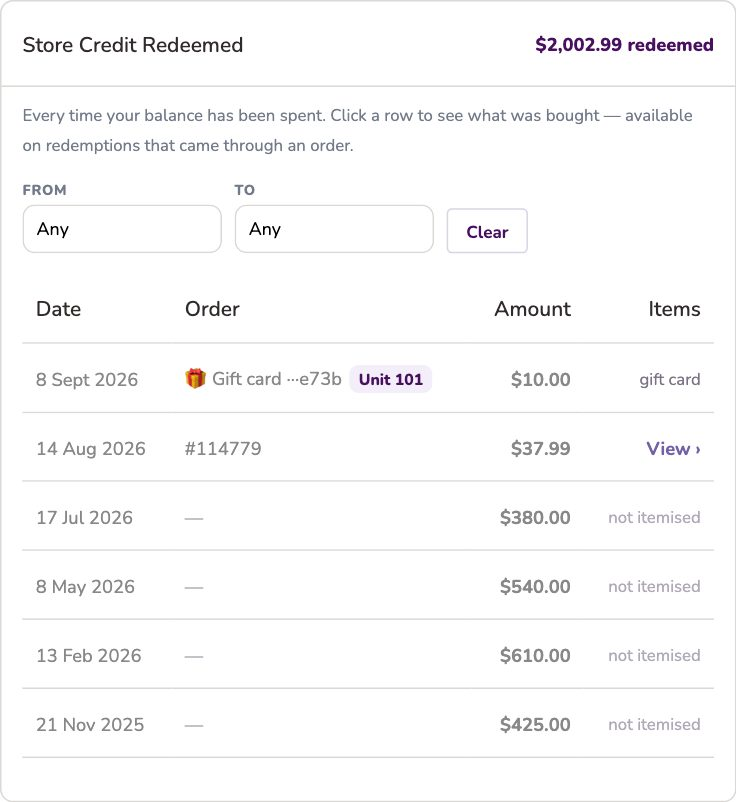
| REDEEMED | Money out, by you. You spent some of your balance — at checkout, or as a cash-out. Nothing has gone wrong; this is the balance being used for what it's for. |
| REFUNDED | Money out, because a guest returned something. The order was refunded, so the commission that came from it is taken back. Also called a clawback. |
| PARTIAL REFUND | The guest returned part of an order. Only the commission on the returned items comes back; you keep the rest. |
You may occasionally see Processing — commission recorded but not yet confirmed into your wallet. It normally clears in seconds. If one sits there, tell us and we'll chase it.
Scroll inside the box to see older items.
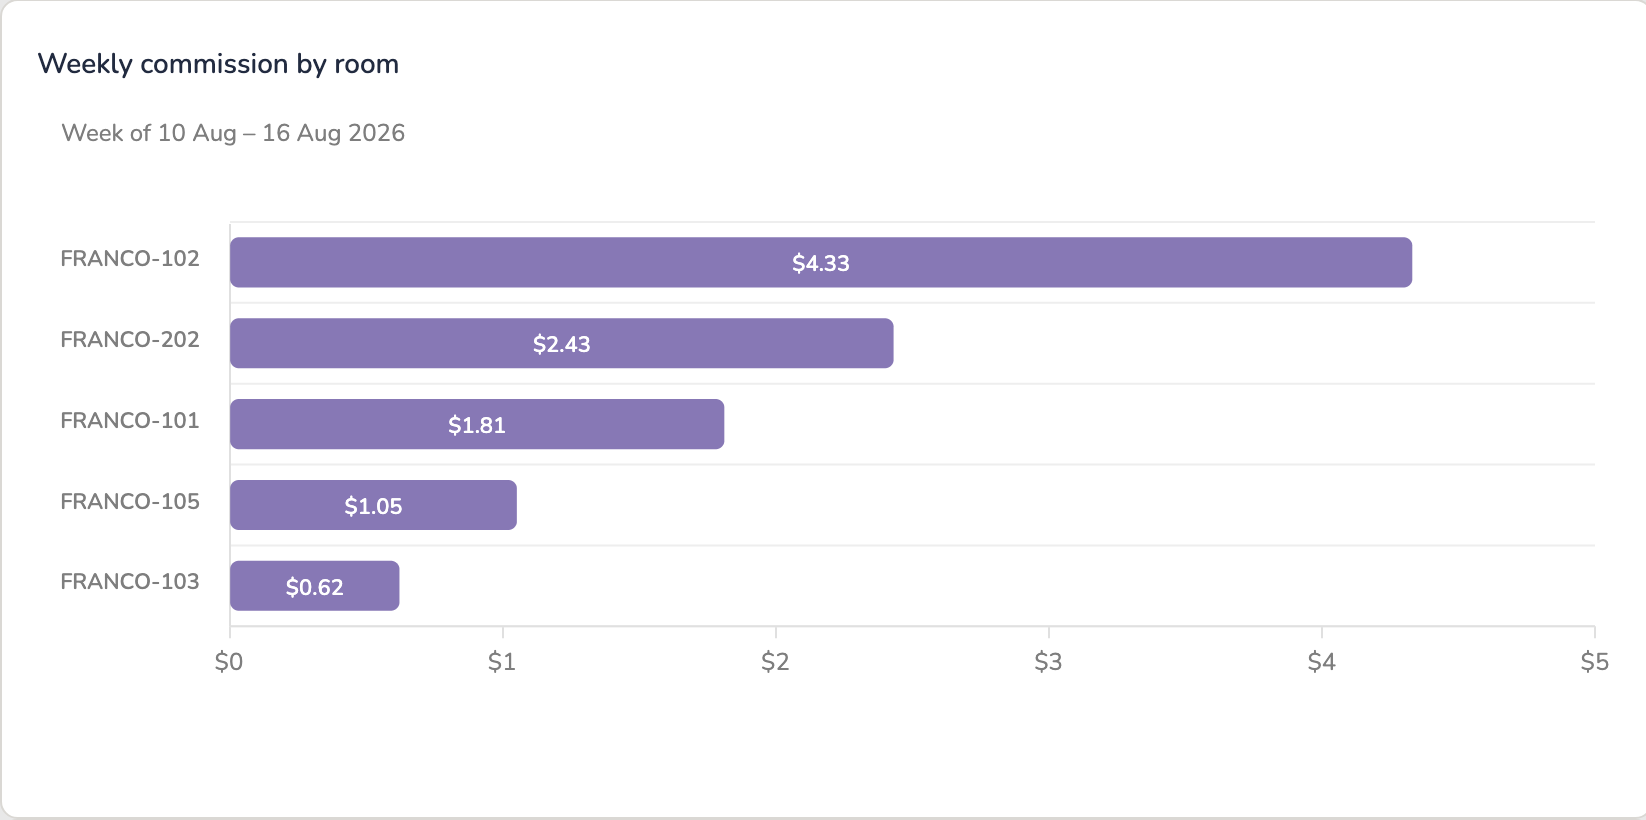
One bar per room for the current week — Monday to Sunday, the same weeks as the owner statements — ranked so the units driving this week's commission sit at the top. The week it is showing is named just above the bars.
Together with the monthly chart and the by-year doughnut below it, the dashboard reads at every pace: weekly, monthly and by year.
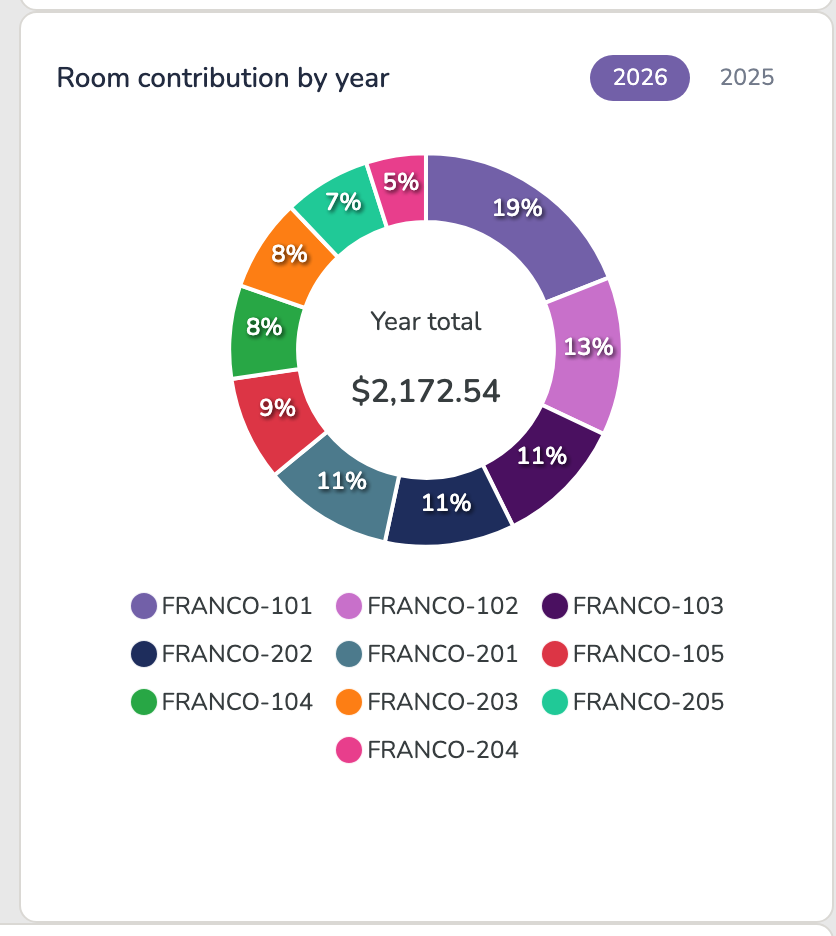
The same earnings shown as each room's share of the total, for a chosen year. Use the year tabs above the chart to switch between years.
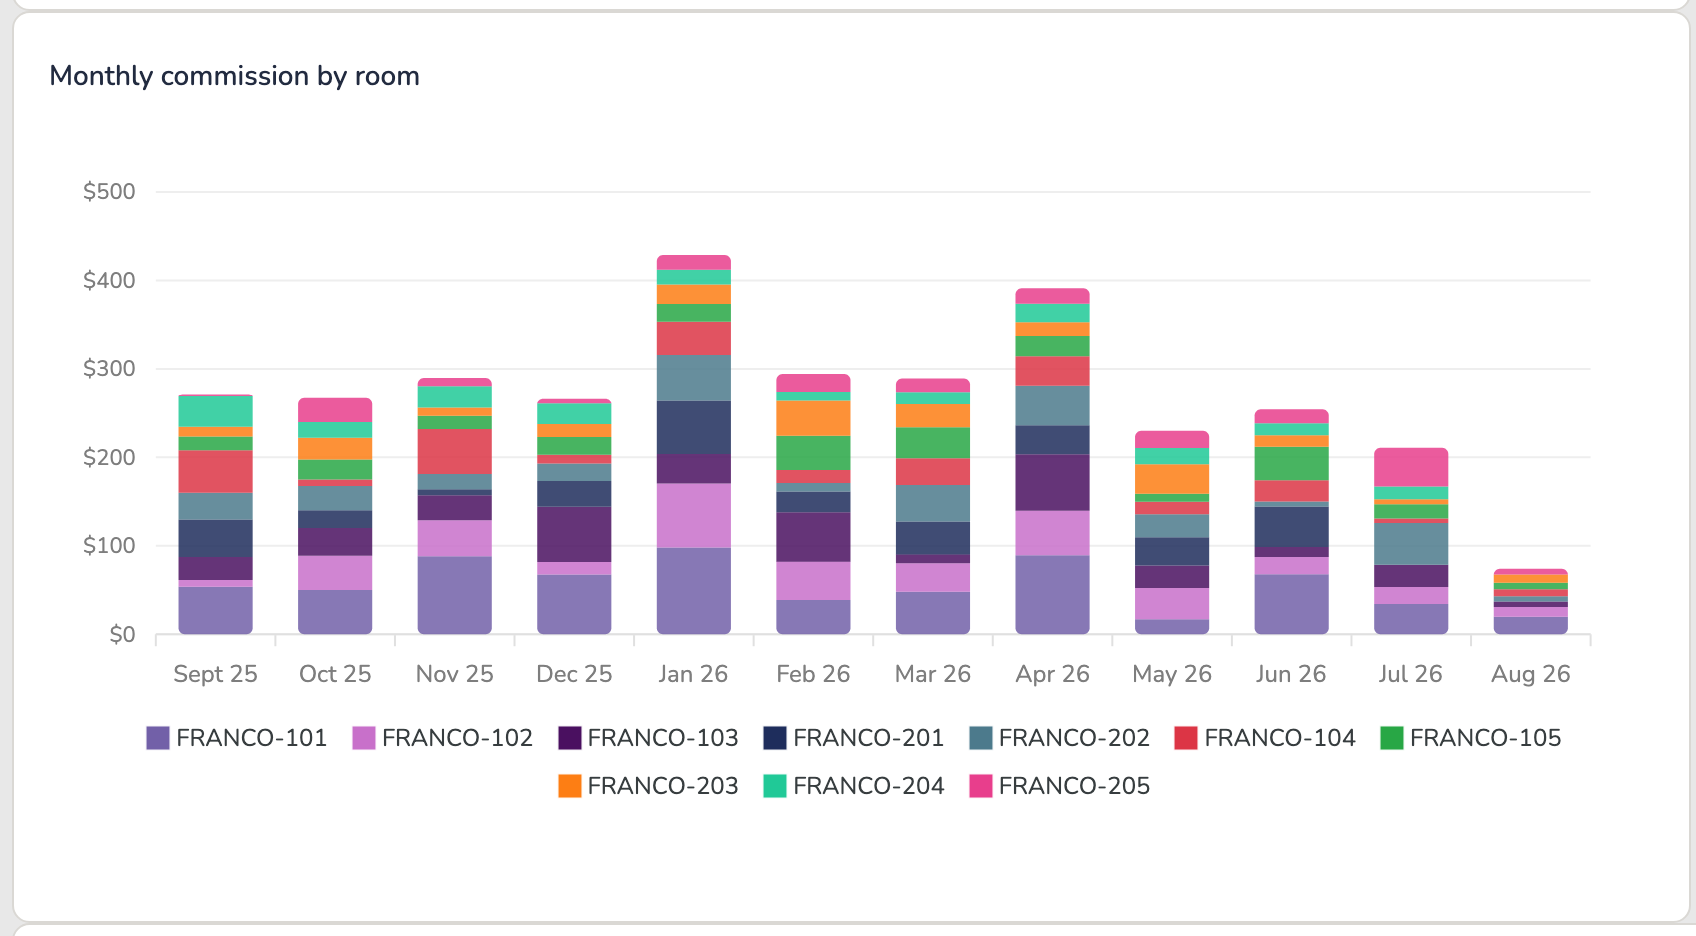
Each month's total commission, broken into colored segments by room. The height is the month's total; each color is one room's contribution to it.
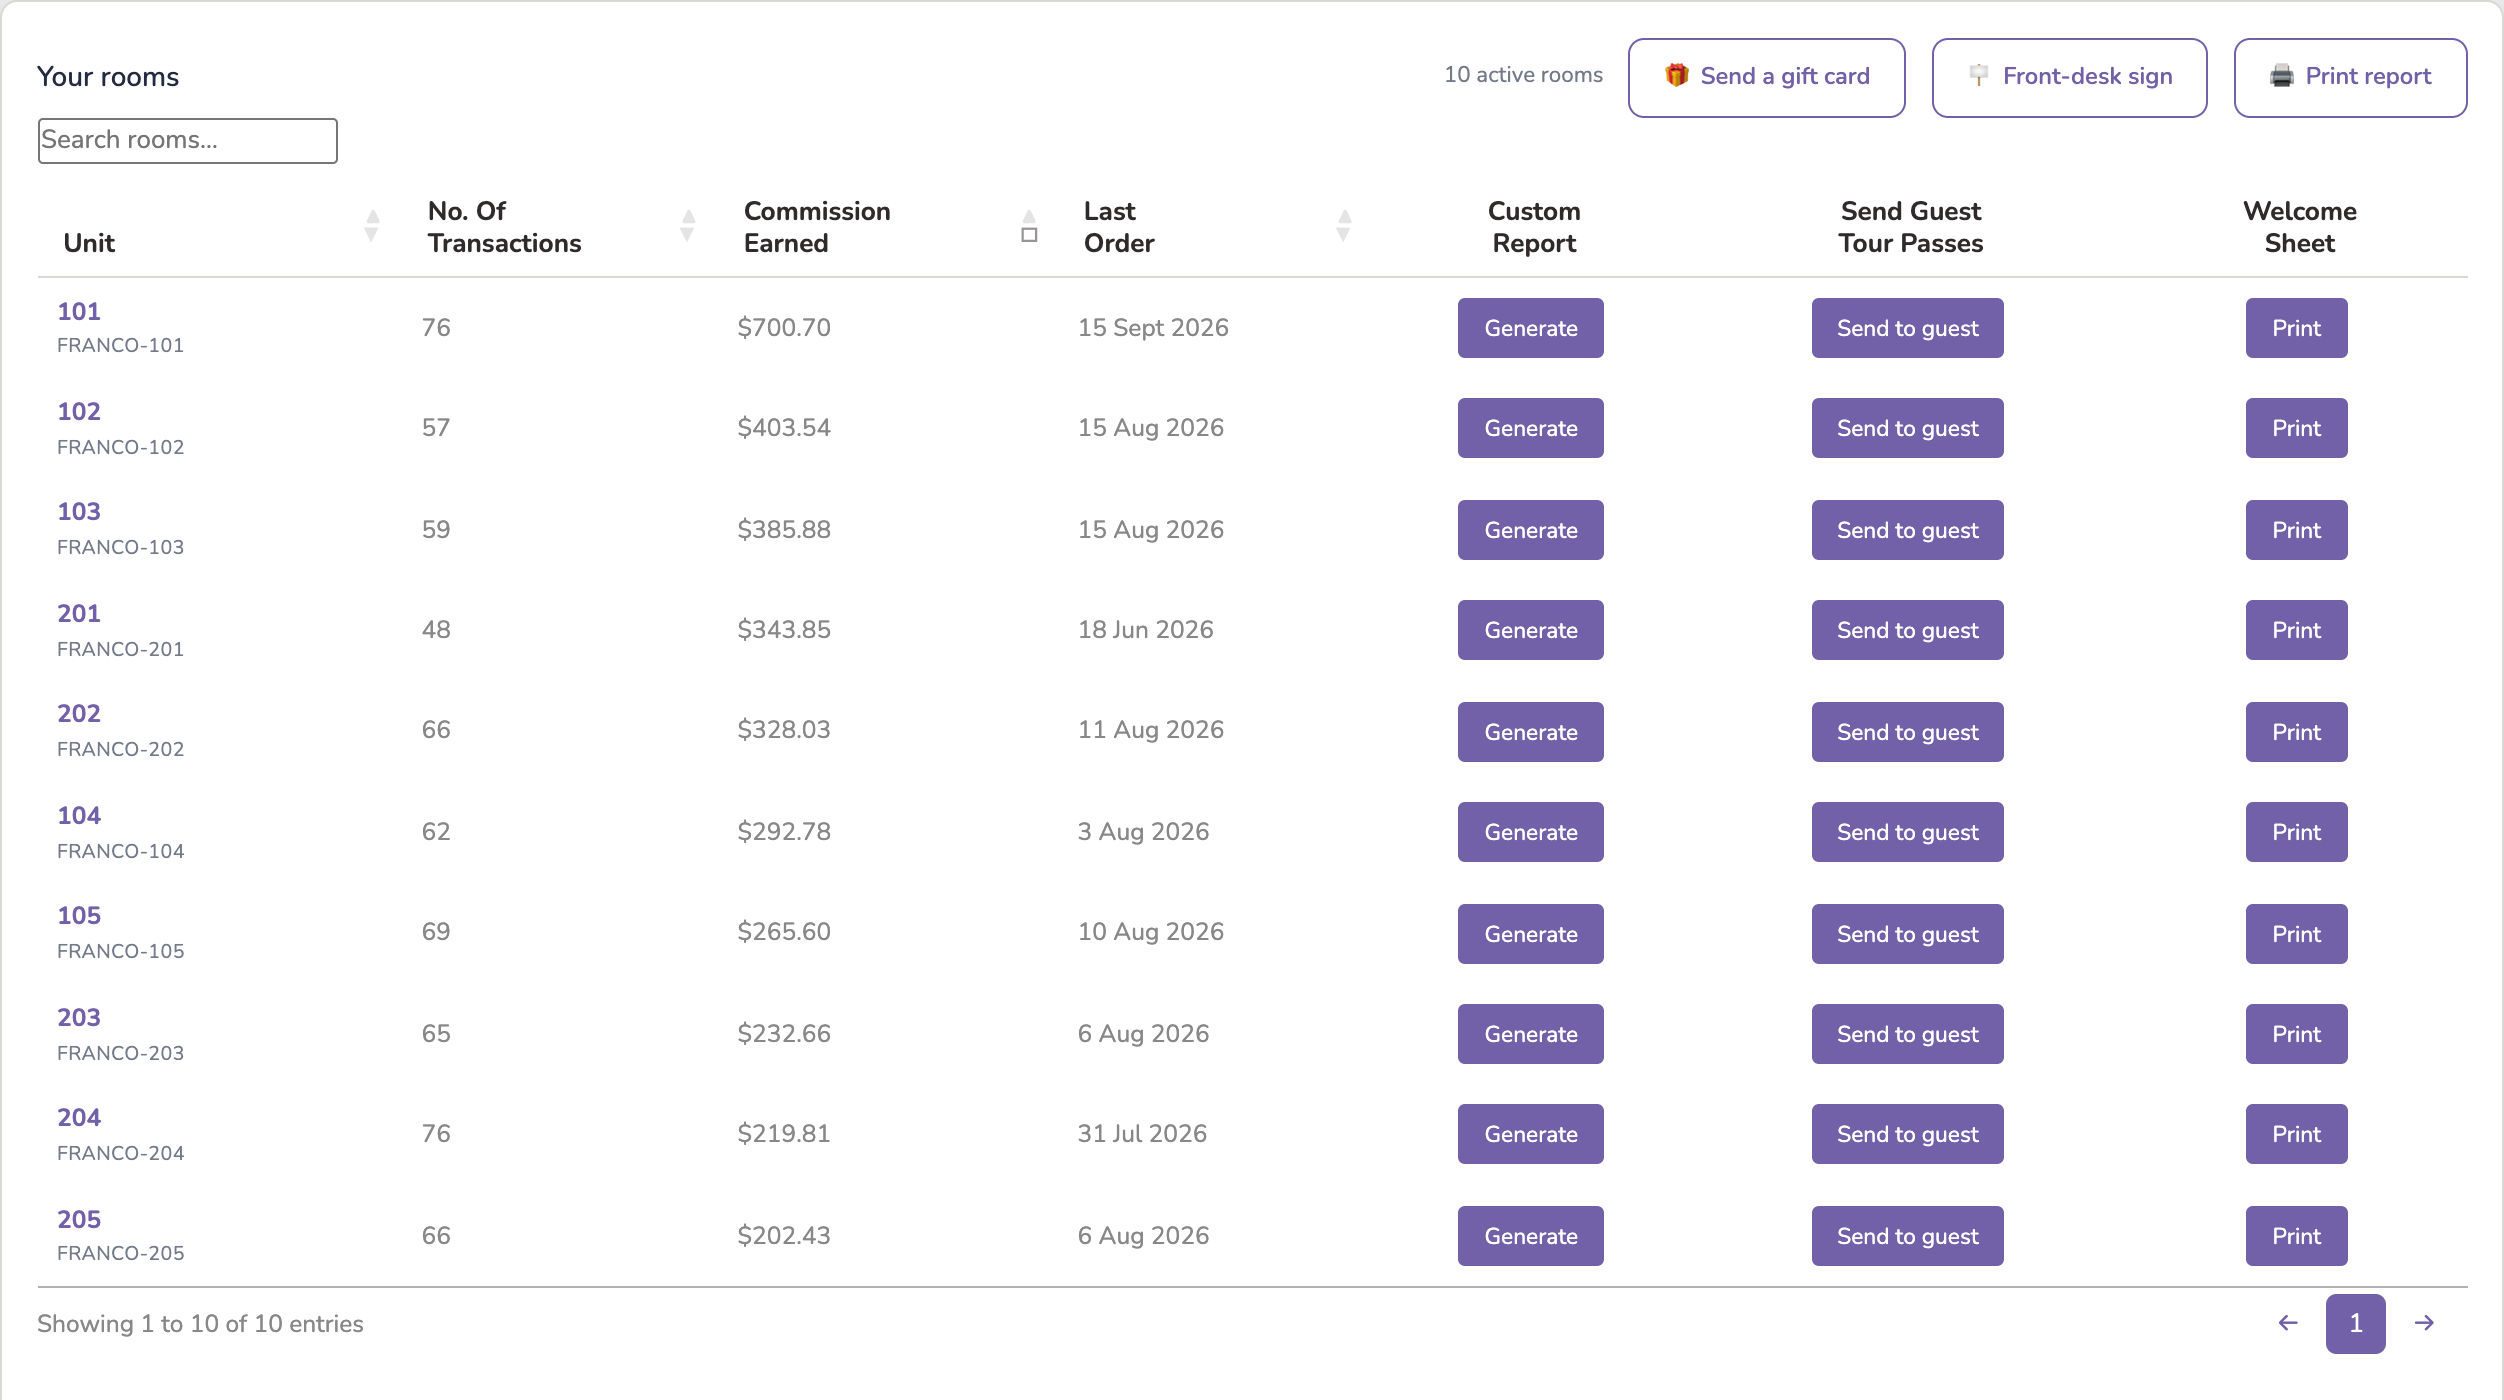
A table of your active rooms showing the room code, unit, number of transactions, commission earned and the last order date — then three things you can do for that room:
| Report | Generate opens a date picker. Choose any period — a stay, a month, a quarter — and it produces a shareable report for that room. See below. |
| Send guest tour passes | Send to guest opens the tour-pass form for that room. See section 12. |
| Welcome sheet | Print opens a one-page sheet for that room to stand in the unit. Its big QR opens the unit's guest page, where a guest adds a 14-day discount card to their phone. It also carries QRs for directions, the store tour and a Google review. See The welcome sheet. |
Click any row to open that room's own detail page. Open your rooms on the dashboard ↗
Plenty of buildings don’t think in unit numbers — a villa has a name, a listing has its booking-platform reference, an office has its own numbering. The Room key legend page ↗ has a Custom referral identifier column for exactly that: press Edit, type your own reference against any room, and Save. It shows on the legend on screen and comes along when you print it.
It is a label, nothing more — it never changes the room’s code, its discount, or anything a guest sees. Use whatever helps your team match our codes to the names you actually use day to day.
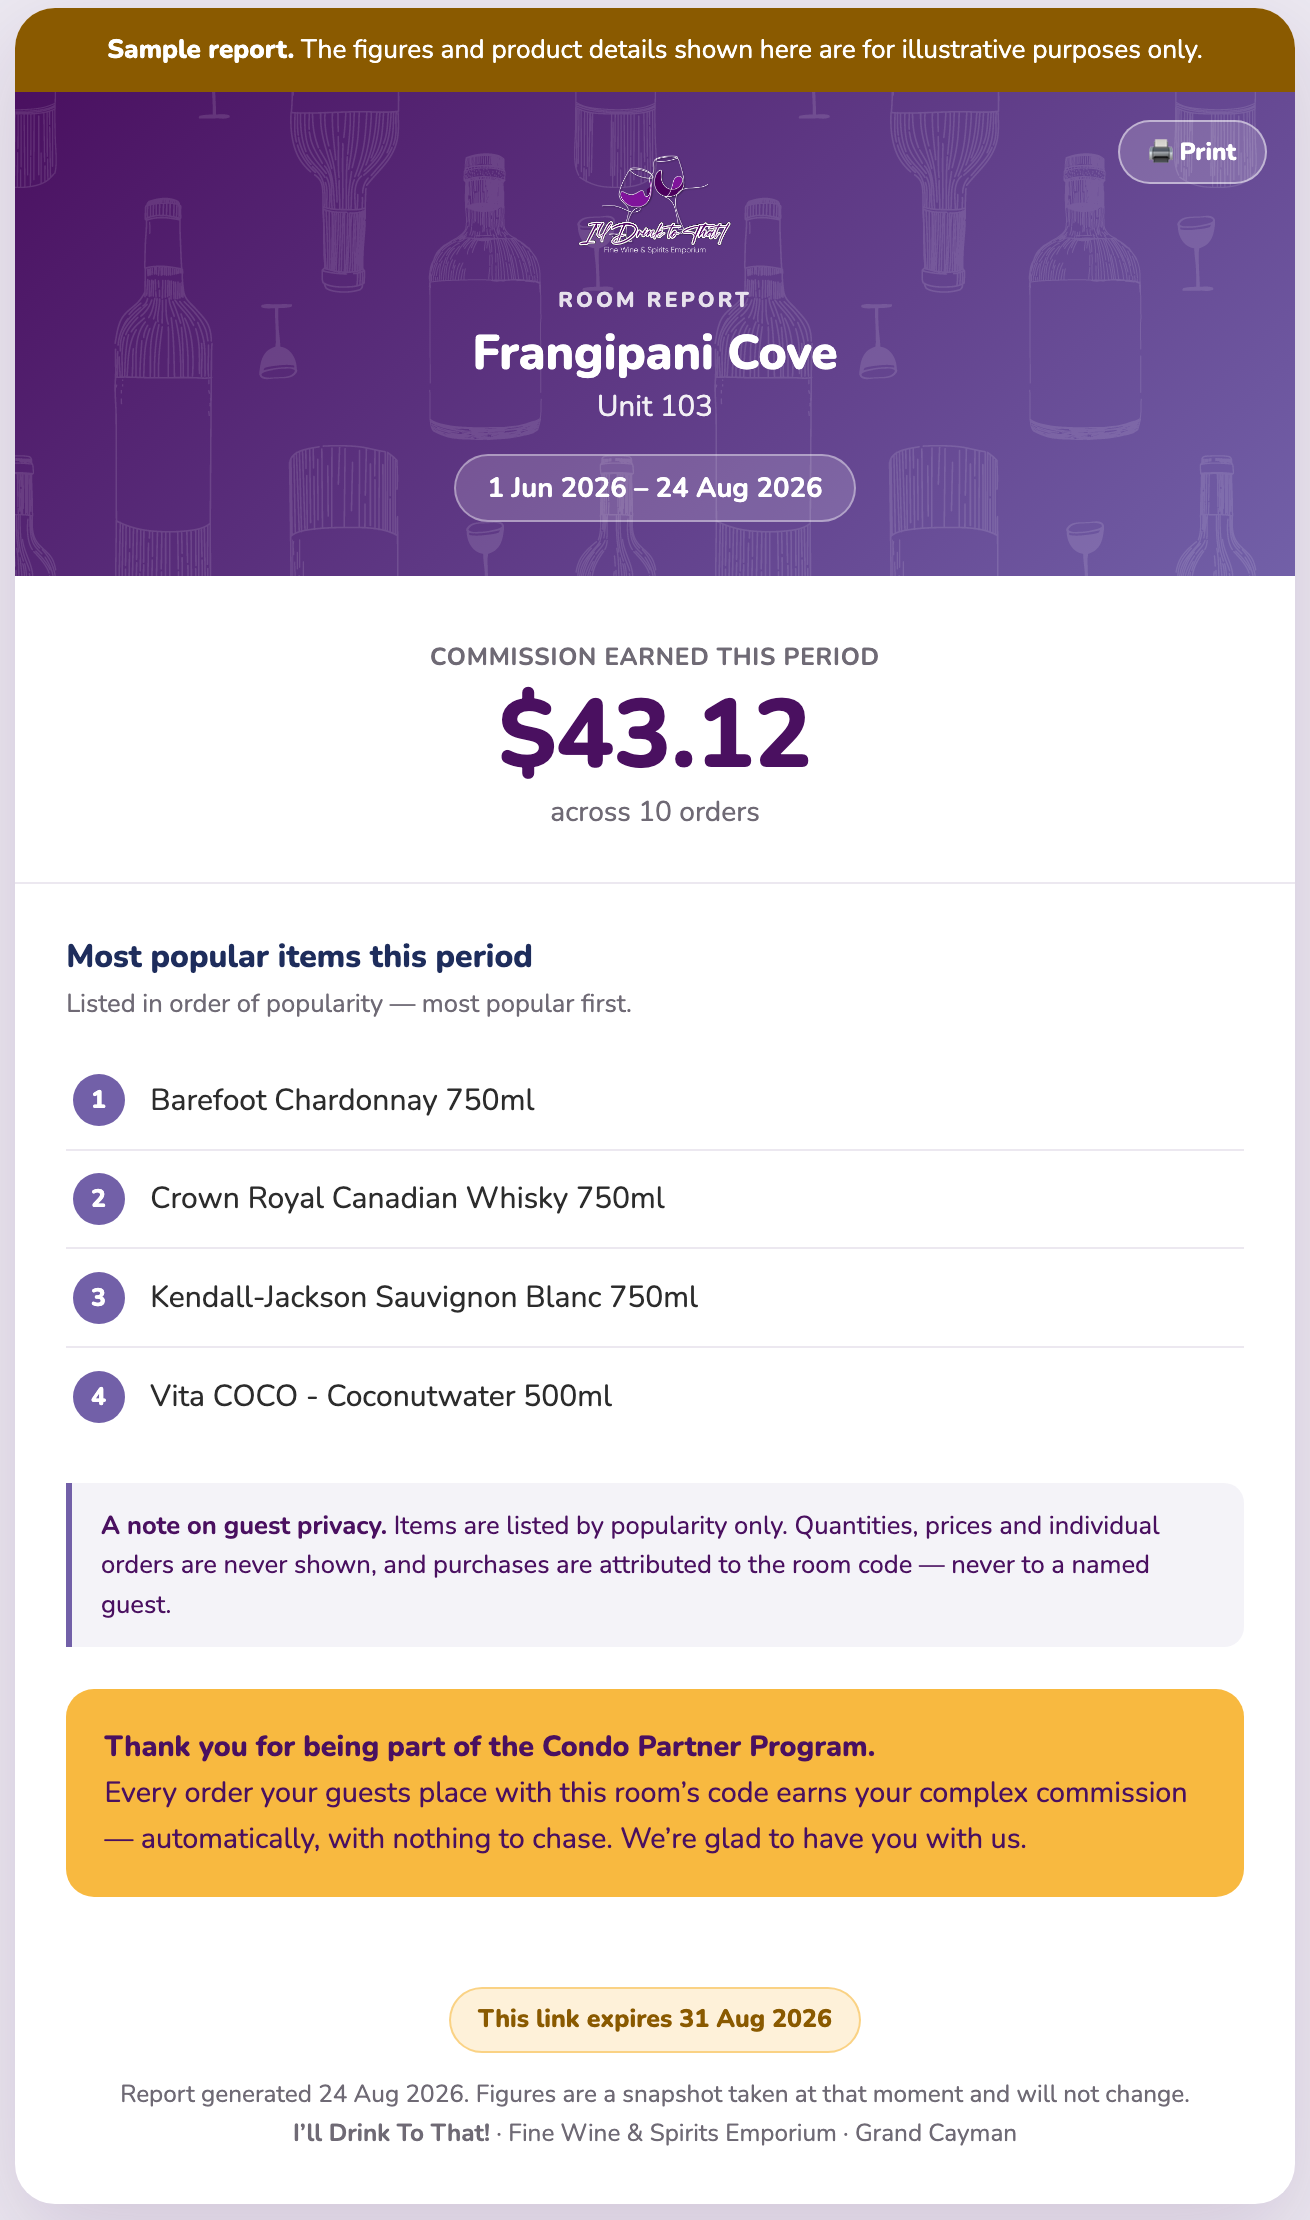
Scheduled statements (weekly, monthly, quarterly, yearly) are set per owner on Condo Owner Management. This is different: a custom report for any dates you like. Click Generate in the Custom report column, pick a From and To date, and you’ll get a report for that room covering exactly that period — the commission it earned, how many orders it came from, and the five items its guests bought most.
Generating a report simply opens it so you can read it — nothing is emailed automatically, because often you just want to look. Each report is its own web page with a link that needs no login. From the report view, a toolbar at the top lets you Print it, or email it with one deliberate tap: Email to office or Email to owner (the owner button appears only when an email is on file). Each email button asks you to confirm once before it sends, so a report you only meant to view never goes out.
You can also produce one from inside a room: open the room, set the Filter by date range on Order history, and click 🔗 Generate shareable report. Same report, reached from wherever you happen to be.
Two reports, two jobs. 🖨 Print report gives you the full order listing — every transaction in the range, line by line, for your files. 🔗 Generate shareable report gives you the summary page — commission, order count and top five items — on a link you can send to an owner. The shared page has its own Print button too, so a recipient can put it on paper.
The all-rooms print (🖨 Print report above the Your rooms table) is a one-page snapshot of every unit — transactions, commission earned and last order — with the account balance. It covers one period at a time: pick it in the toolbar at the top of the preview — This week, Last 7 days, This month (the default), This year or Lifetime — or set your own From and To dates. The page redraws as you choose, and the period is printed on the report itself, so whoever reads it knows exactly what it covers.
Every enrolled unit has its own permanent code and one QR code. The QR opens the unit's own guest page. A guest scans it, adds a 14-day discount card to their phone (Apple or Google Wallet), and shows the card at the till. Everyone staying in the unit can have their own card. Shopping online with the discount applied is coming when the online store opens.
The welcome sheet is how that QR reaches the unit: a single letter-size sheet designed to sit in a clear acrylic stand (any office-supply shop sells them) on a counter or side table, where guests actually see it.
Press Print in the Welcome sheet column of the room's row (or Print the welcome sheet on the room's own page). It opens in a new tab, already filled in for that unit: one big QR that opens the guest page, a QR for directions to the store, one for the 360° store tour, one to leave us a Google review, and the note that we deliver directly to the unit. Then press Print this sheet — or choose Save as PDF in the print dialog if you'd rather send it to a print shop.
The Room QR column has two more buttons. Download saves the unit's QR as an image (Room 101.png) for any in-room guide of your own — a welcome book, a house-rules card, a laminated quick-reference sheet. Request new QR code is for a QR that has got out: tell us why if you like, and we issue a fresh one, usually the same day. The old QR stops working the moment the new one is issued, a notice appears on your dashboard, and you print the welcome sheet again (Download gives the new image too). A room's own page has the same two buttons.
Opening a room shows its own page: the room's lifetime commission, a monthly earnings chart just for that room, and its full order history (date, order, commission and status).
Above the order history you'll find a From / To date filter — pick a start and/or end date to show only the orders in that range (handy for checking a specific month or quarter), and tap Clear to see everything again.
You can also tap 🖨 Print report to print (or save as PDF) a clean statement of the orders in your chosen range, with the total commission. A date range is required before printing, so the report stays focused rather than listing every order ever.
Use ← Back to dashboard at the top-left to return to your main page.
On any room's page you'll find Guest purchases & product preferences. Pick the From and To dates of a stay, tap Show purchases, and you'll see the products bought with that room's code during those dates.
The report lists the top five different items from that period, most popular first. It's there to help you spot what a guest enjoyed — so when they book again, you can have their favourite waiting for them.
Your guests can claim a complimentary tour pass for a partner tour. To send one, open the Your rooms table and click Send to guest in the Send guest tour passes column for the room your guest is staying in (you can also do this from that room's own page).
A short form pops up right there in the dashboard, already filled in with your complex and the unit — add the guest's name and email, their check-in and check-out dates, tick the tour or tours, and send. The dates matter: the pass is valid for exactly that stay and not a day longer, which is also why a unit can hold only one live pass at a time. The pass is then built and emailed straight to the guest: a branded pass with its own QR code, one per tour ticked.
At the tour, the pass does the talking. The guest shows it on their phone (or printed), the tour partner verifies it at the door, and it is marked as used there and then. Each pass is good for one redemption — once used it can't be presented a second time, and one that never gets used simply expires on its own when the stay ends. Nothing to cancel, nothing to chase.
Send one from your rooms table ↗
A room can only have one live tour pass. While a guest is holding one, that room's button is replaced by an amber Blocked chip showing the date it frees up:
Blocked · until 18 Aug 2026
A tour pass is valid for that guest's stay. Once the stay is over the button returns by itself and the next guest can be sent one — there is nothing for you to clear down, and no need to contact us.
Only the room holding a pass is affected. Every other room stays available, so a full building is never held up by one guest.
You earn 5% commission on commissionable items only — wines, spirits, and other selected products — purchased with your room codes. It is not earned on the full order total or on non-commissionable products. Your commission is deposited to your store credit balance automatically — usually within minutes — and you can spend it at checkout just like store credit.
Your complex can also cash out part of its balance: up to 20% of the total redeemable commission, paid by cheque, with the rest staying as store credit. The Total redeemable in cash figure under your Current balance tracks exactly how much.
Your commission is store credit — it is spent against goods rather than converted to cash, which keeps your account simple to run. That's why there is no cash figure on your dashboard.
Room codes and QRs are for your guests. Each belongs to one unit and is meant for the people staying in it. Please don't post a unit's code or QR publicly — on social media, a rental listing or a community group — or share them outside your complex. Beyond being unfair to other partners, it fills your own dashboard and reports with purchases that were never your guests', so the numbers stop telling you anything useful. Section 18 of the terms covers this.
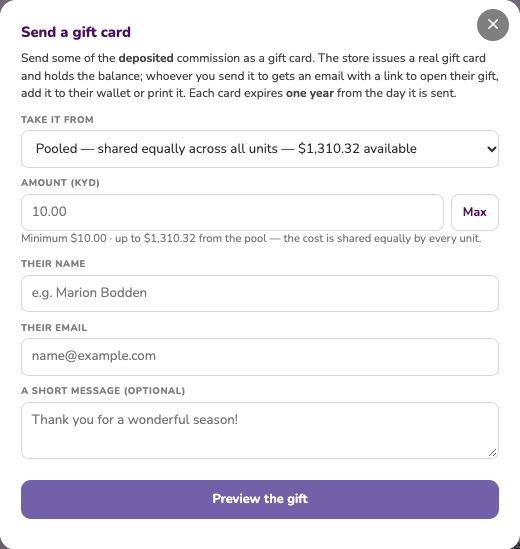
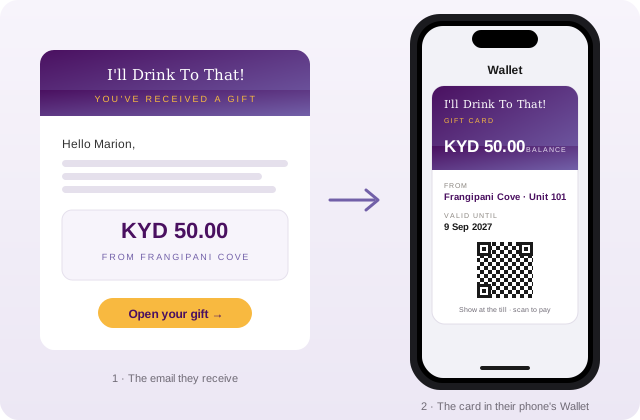
Why this exists. Commission sits in your account as store credit. A gift card is the way to hand some of it to a person — a thank-you to a board member, a welcome gift for a guest, a departing owner — without anyone coming to the store. The store issues a real gift card for the amount, manages its balance from then on exactly as it does any gift card, and the recipient gets it on their phone.
Where. The 🎁 Send a gift card button at the top of the Your rooms table. A room’s own page has Send a gift card from this room, which pre-selects that unit as the source.

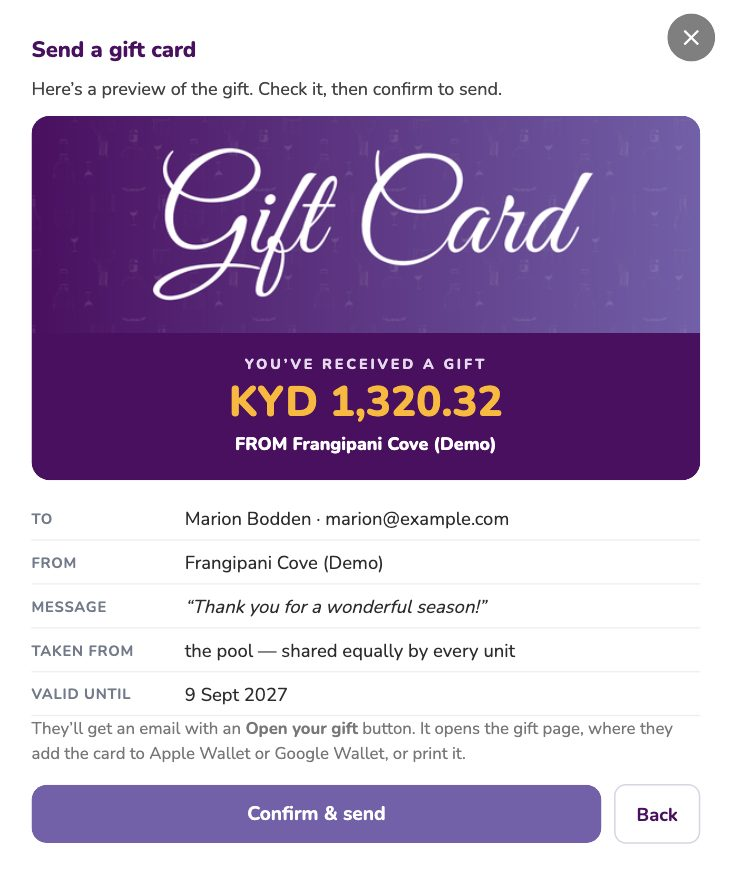
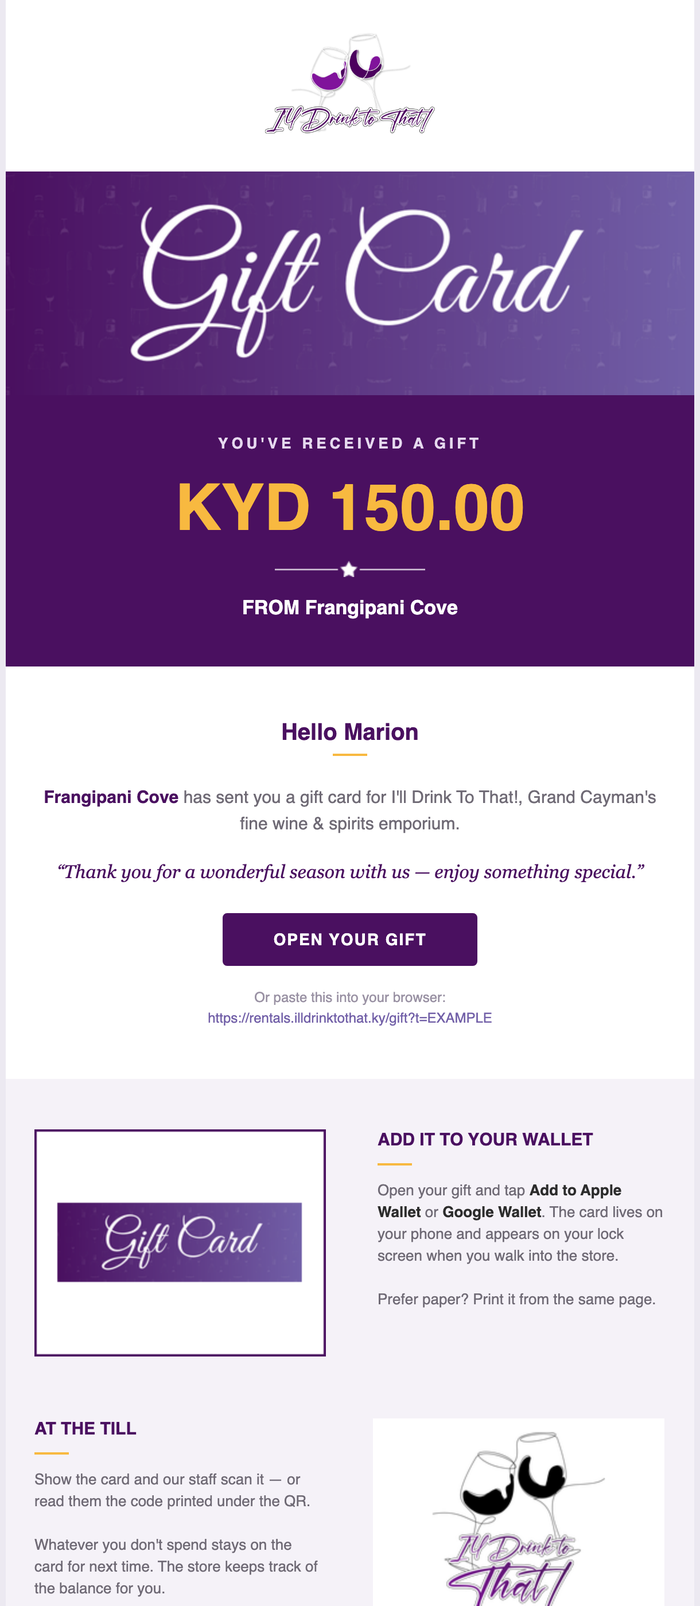
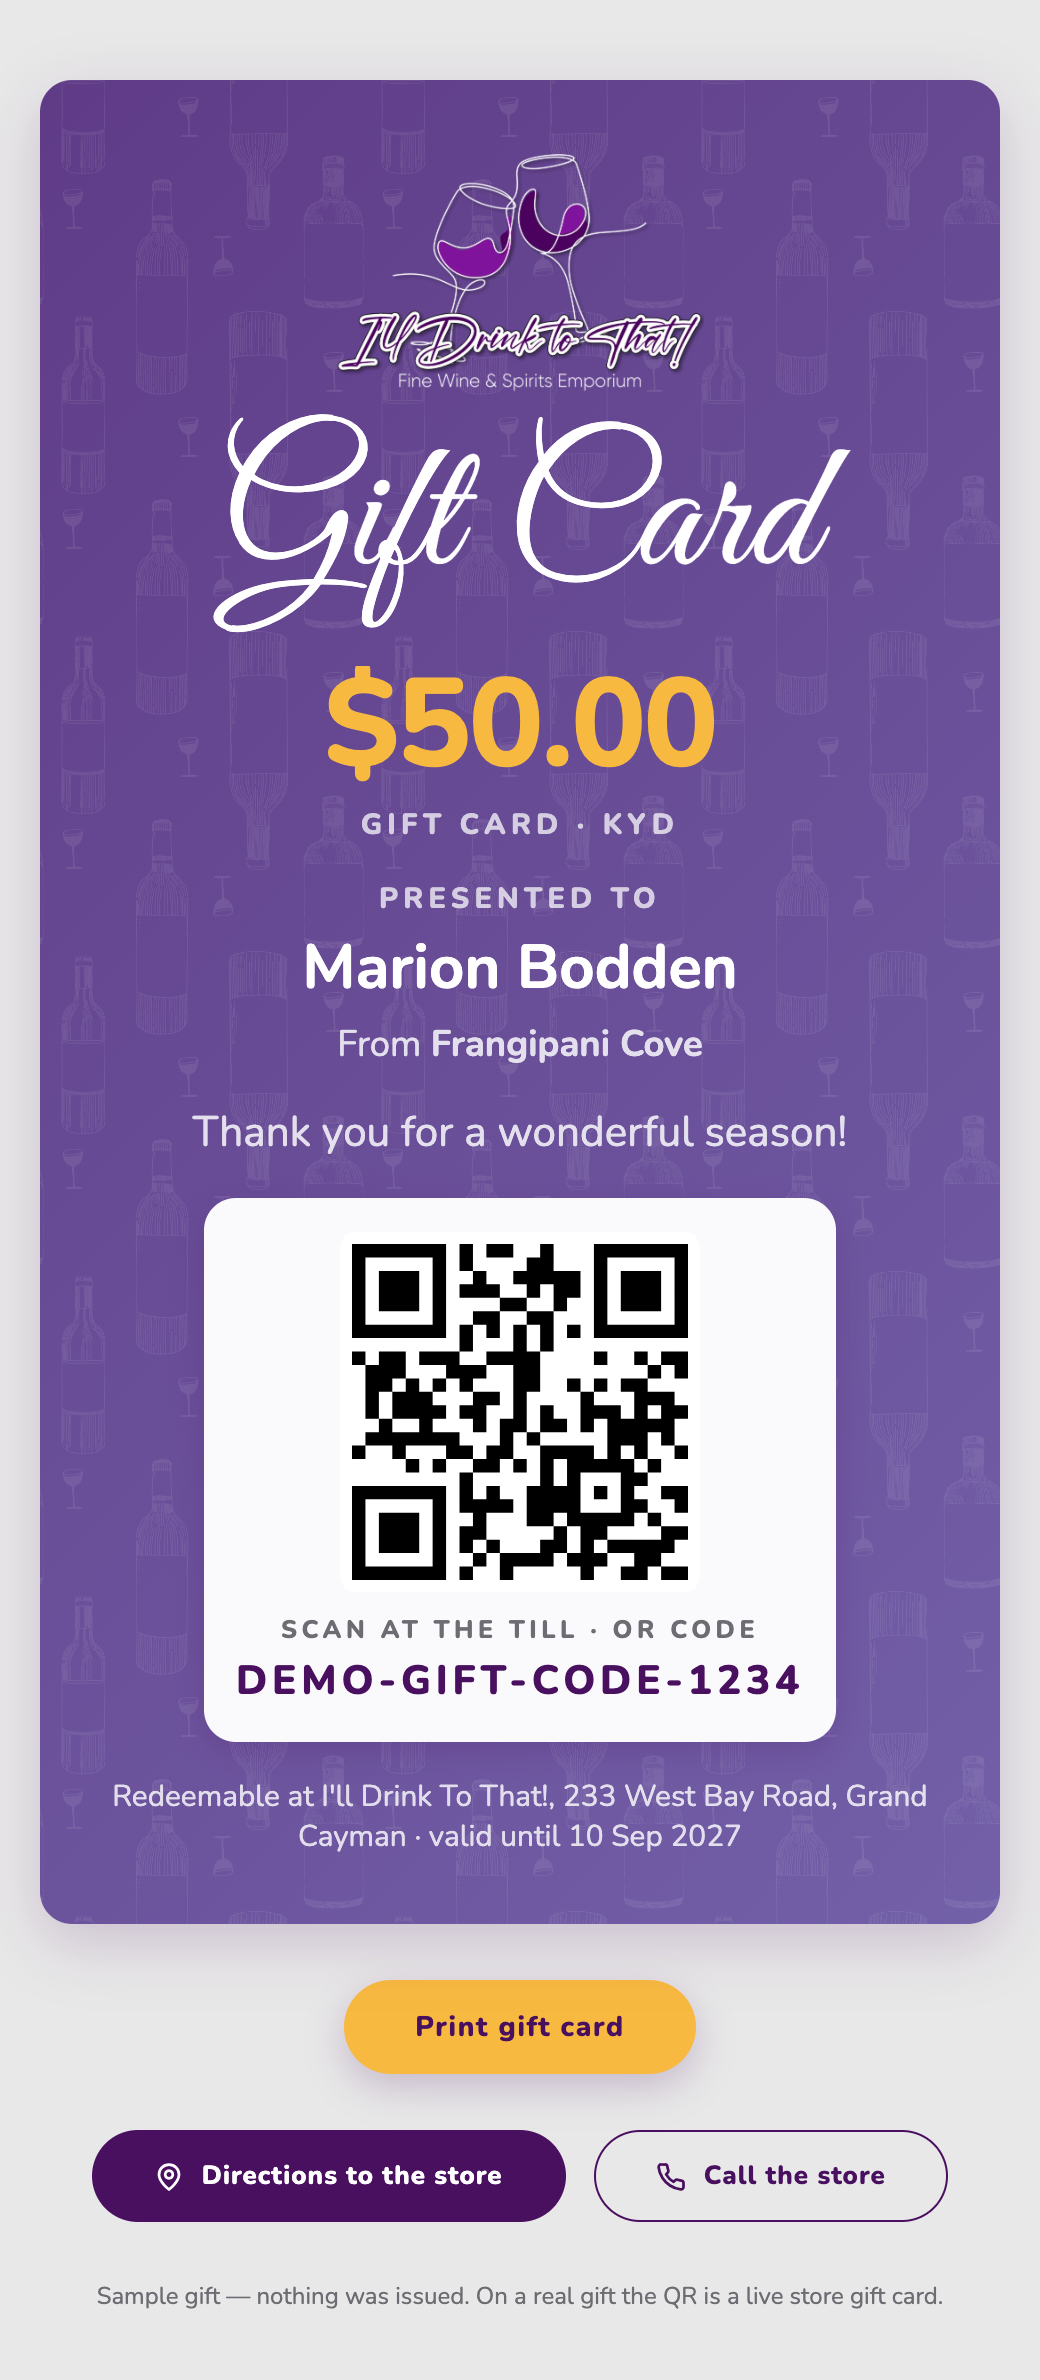
An email — “your complex has sent you a gift” — with one button, Open your gift. It opens a gift page where the parcel unwraps and the card is simply there: the amount, your message, its QR code, an Add to Apple Wallet or Google Wallet button, and Print. There is nothing to copy or type. At the till, staff choose gift card as the payment method and scan the QR from the wallet pass, the printed card or the phone screen.
Why this exists. The commission your pool earns is made up of what each unit's guests spend. Owners want to know what their own unit is contributing — and answering that by hand, unit by unit, every month, is the kind of job that quietly stops getting done.
So the system does it. But to send an owner anything, it has to know who they are and which unit is theirs. Condo Owner Management is where you tell it. Everything else on this page follows from that one record.
For their reporting it is purely a record for your office — no owner is ever chased to fill in a statement form: you enter their details, and you decide what they receive. That conversation stays between you and them. (Joining or leaving the pool itself is different — those changes the owner does confirm by email, and section 15 walks through every step.)
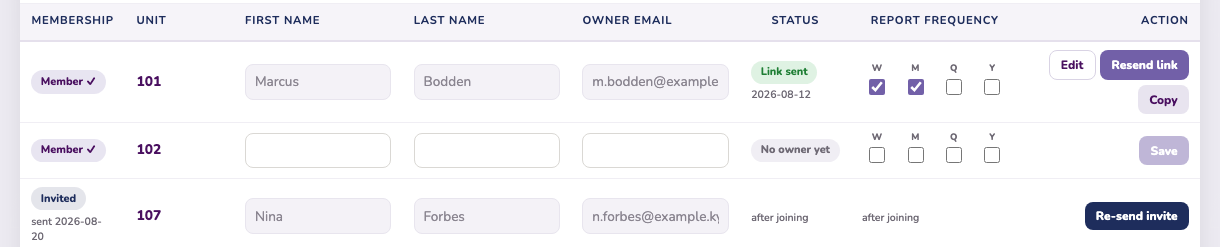
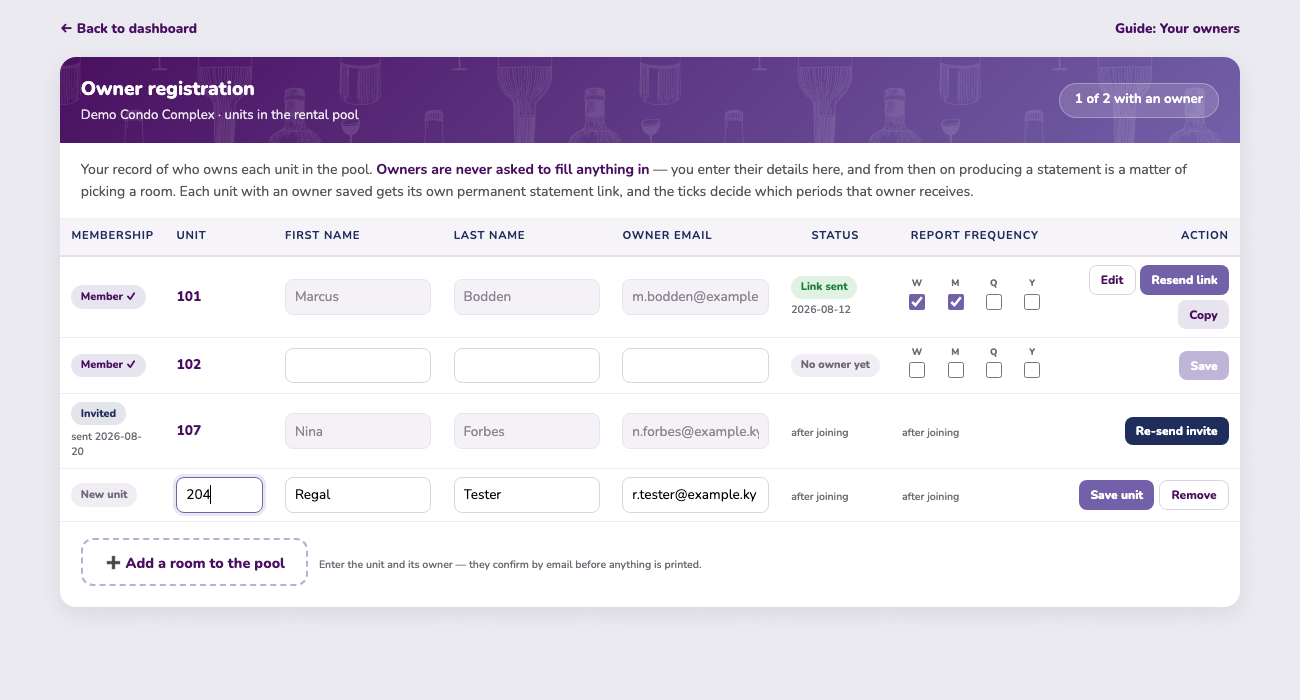
Open Condo Owner Management ↗ from the top of your dashboard, or from beneath Your rooms. Enter a first name, last name and email against a unit and press Save. That is the whole job.
From then on the unit knows where its reporting goes. Producing a statement becomes a matter of picking a room rather than looking up an address, and the header tells you at a glance how many units still need an owner — “31 of 40 with an owner”.
Units that joined through a pool invitation (section 15) arrive here with the owner’s details already saved — for those, your only job is choosing which statements they receive.
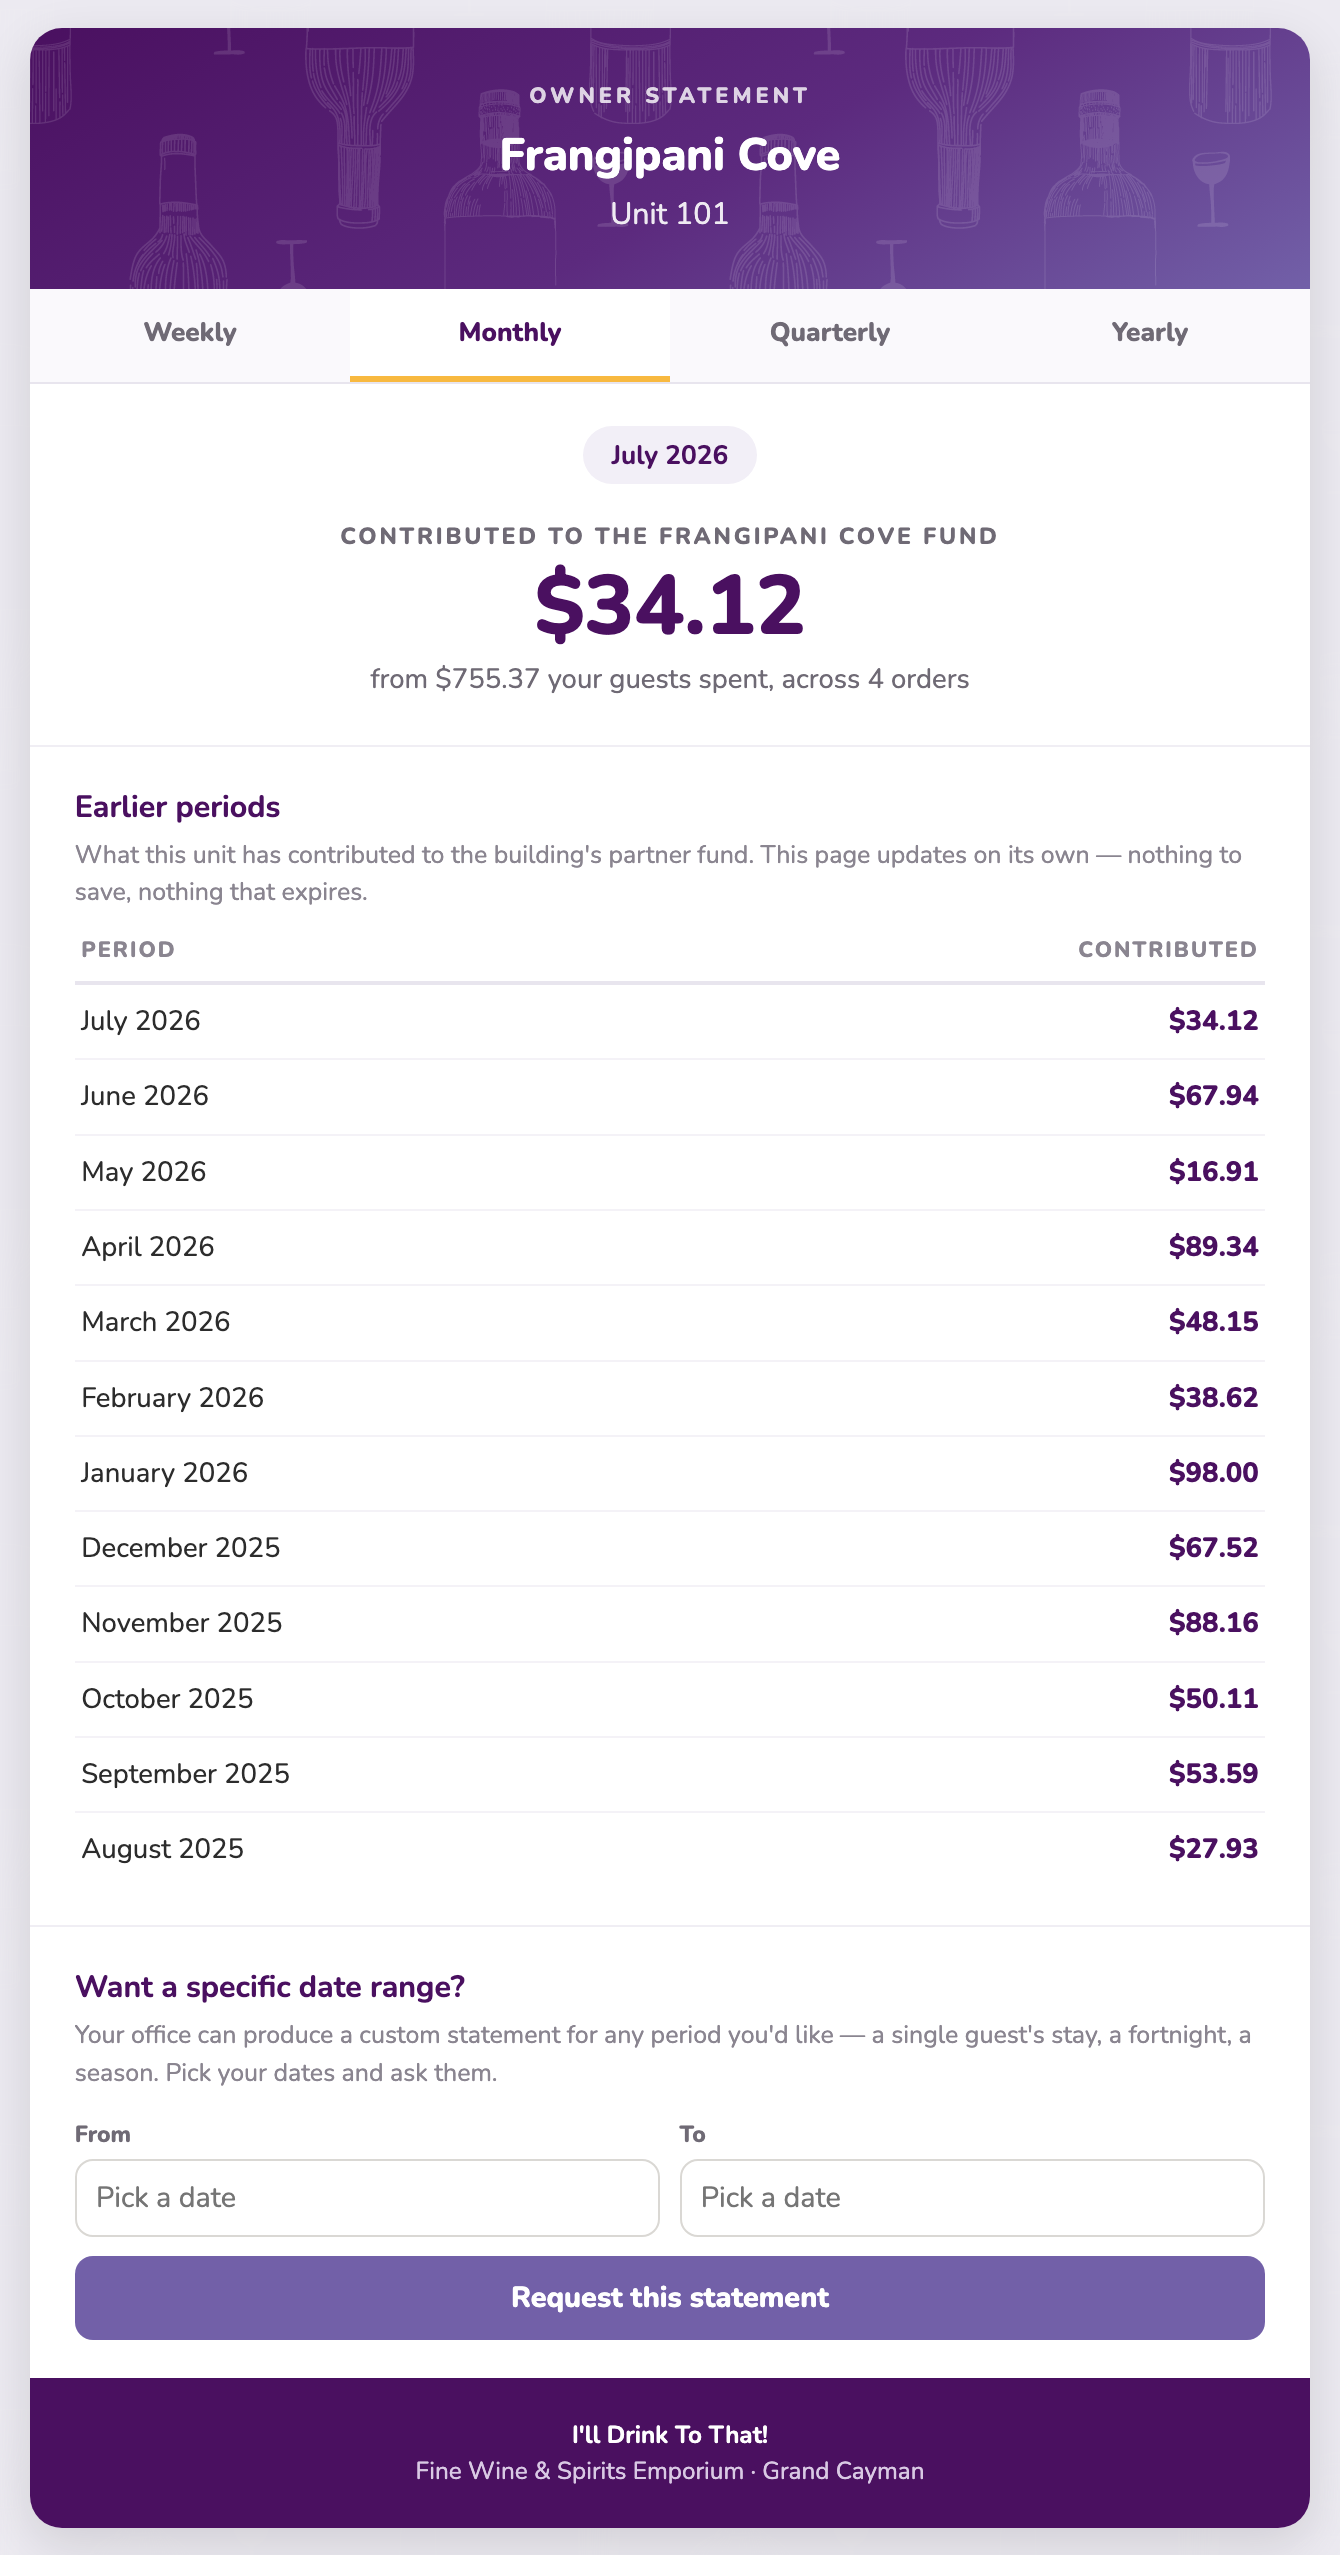
An owner's statement shows, for the period in question: what their unit contributed to the pooled commission, how much their guests spent to generate it, and the items those guests bought most. Underneath sits the same figure for every earlier period, so they can see a season take shape.
It is deliberately framed as a contribution to the pool, not as a private balance. The commission belongs to the complex; the statement shows an owner what their unit brought to it. How the complex uses that income is a matter for the complex, and the page says nothing about it.
Each registered unit gets its own permanent statement page on a private link. It shows what that unit contributed over the period, the items its guests bought most, and the periods before it. There is no login and nothing to install, and the page updates itself — so a link you send once keeps working.
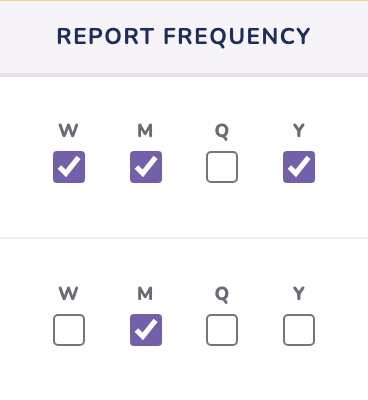
You choose which periods appear. Weekly, monthly, quarterly and yearly are independent ticks, so an owner can have weekly and yearly and nothing else. Tick one later and that view simply appears on their page. Untick them all and the page still works — it just shows the one default view.
Open Condo Owner Management, click Edit on that unit and update the details. Correcting a spelling is Save edits and changes nothing else. Changing the email address is treated as a change of owner: the only option is Save & resend, which issues a new statement link and retires the old one immediately, so a former owner cannot keep seeing a unit they no longer own.
An owner can ask for a statement covering any dates they like, straight from their own page. The request arrives as a notice on your dashboard with the unit and the dates already filled in — you generate it from that room's Order history in the usual way and the link goes to them.

Why this exists. A rental pool is not a fixed list. Owners join the building, owners move on, and some run their unit themselves for a while before coming round. Membership is the machinery for all of that — and it runs from the same Condo Owner Management page you already know. You start each change from your roster; joining and moving are confirmed by the owner by email; the system builds or retires everything else on its own.
Most owners have never heard of any of this, and an invitation lands better when something explains it first. On Condo Owner Management ↗ you’ll find ✉️ Introduce the programme… at the bottom of the roster, and an ✉ Intro email button on each unit you have added.
It writes the email for you, in your name. Press it and your own email program opens with the whole thing ready — addressed to that owner, your complex named throughout, and every word editable before you send. Nothing is sent for you, and we never touch your mail account: the button simply saves you writing it from scratch.
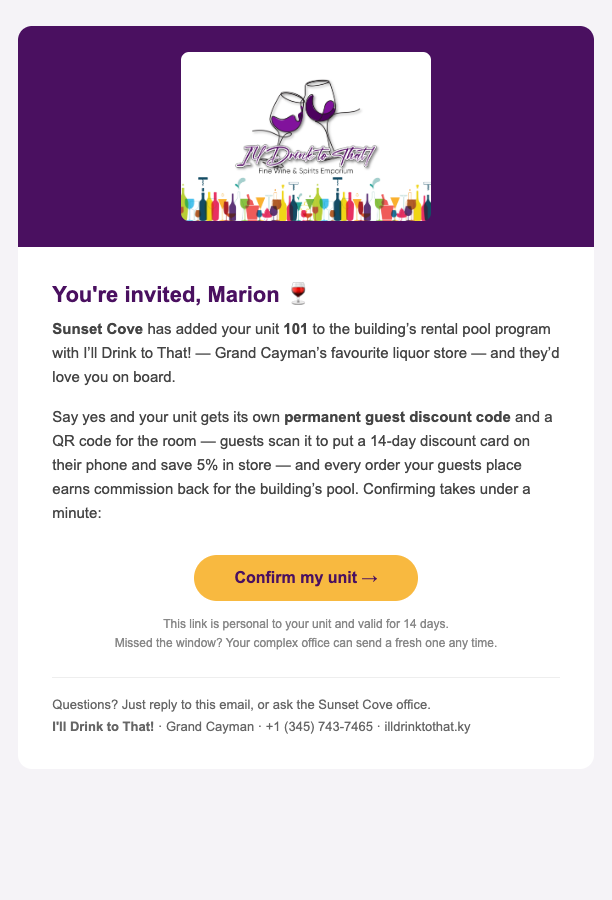
The email explains the programme in a few lines and links the owner to a page that lays out what taking part looks like — what every unit gets either way, and everything that comes with being in the pool. From there they either reply to you to join the pool, or register independently if they’d rather run their unit themselves.
Two different notes can appear under a unit you’re adding, and they mean different things:
| Red note | The unit already has a live seat on your account — a member, a pending invitation, or a suspended removal. Nothing to add; it’s already yours. |
| Amber note | The unit’s owner registered it self-managed, directly with the store. It keeps its own earning history, so it can’t simply be re-added — but the note carries a button to invite the owner to move it into the pool. |
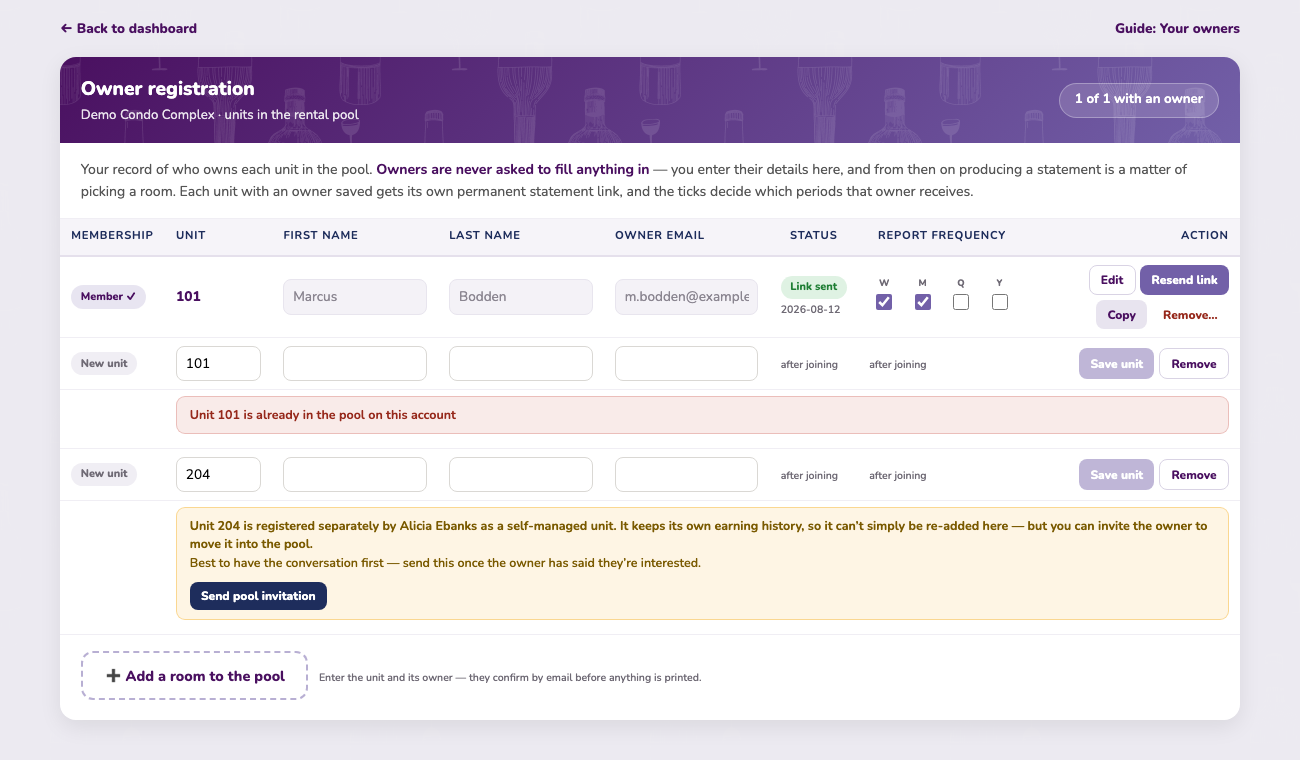
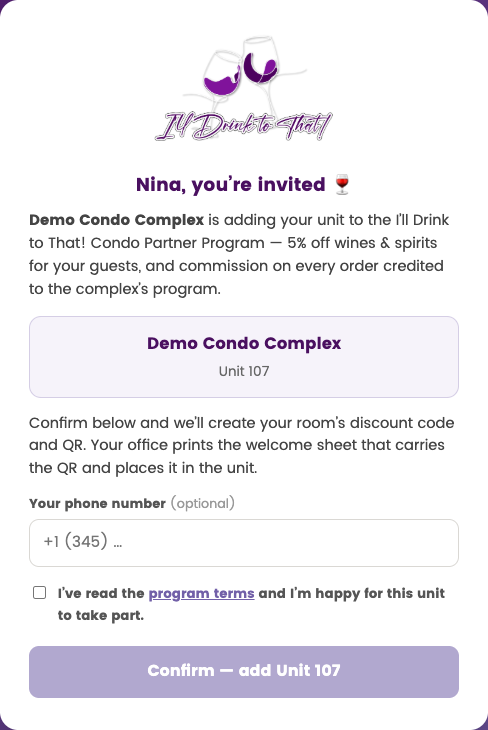
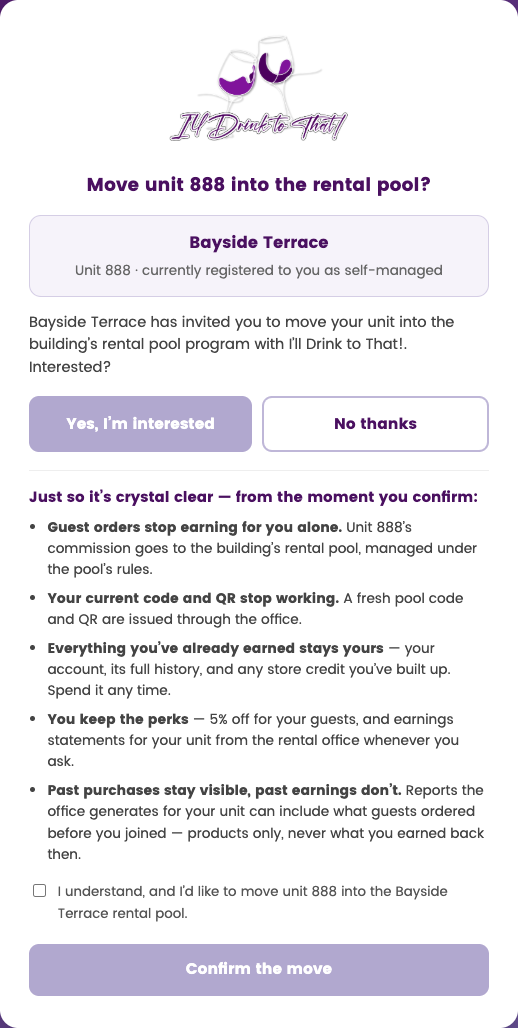
Have the conversation first — the note reminds you — then press Send pool invitation. The owner’s consent page spells out exactly what changes: commission goes to the pool from that moment, their old code and QR stop working and a fresh pool code and QR are issued, and everything they earned while self-managed stays theirs — their account, its history, their store credit. One tick, one confirm, and the unit appears on your roster as a full member with everything already built. You never touch a thing — a notice lands on your dashboard the moment they accept, so you know the second it happens.
Every unit on your roster has an Owner type: Pooled owner (the normal case) or Independent owner. Which door you use depends on who is deciding.
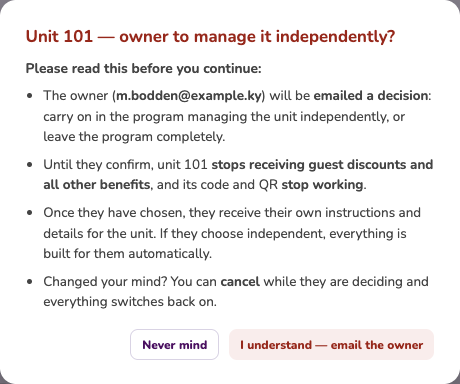
Door one — the owner decides. If an owner wants to run their unit themselves, or you are not sure what they want, change the unit’s Owner type to Independent owner and press Save. Choosing in the dropdown alone does nothing; a box then explains what happens and asks you to confirm you understand (I understand — email the owner):
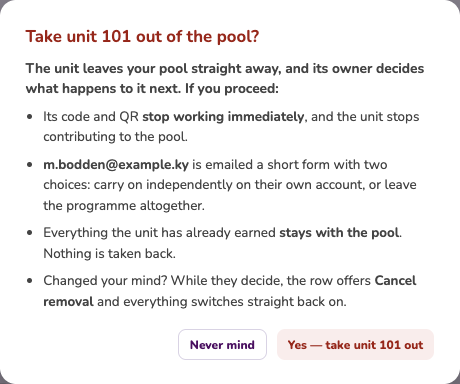
Door two — you remove the unit. Remove unit on the row is for a unit that is no longer there, has left the complex, or that you simply want out of the pool. Its warning box is blunt on purpose: the owner stops receiving every benefit — no discounts, no statements, no store credit for that unit — and its code and QR stop working, with no decision form. It also offers door one instead: if the owner might want to carry on independently, choose Never mind and use Independent owner + Save. If you proceed, we honour it — the unit is removed on the spot and a notice records it on your dashboard.

If they choose self-managed, the system builds their entire solo setup — their own code, QR and login — and your pool keeps every cent it earned to date. If they choose to leave altogether, that’s that: a clean exit, nothing owed in either direction, and they’re welcome back any time. Either way, a notice tells you on the dashboard the moment they decide.
| Member ✓ | A full member. Its code earns for the pool, and everything in this guide applies to it. |
| New unit | A seat you’re still typing — nothing is saved until you press Save unit. |
| Invited | Saved and waiting on the owner’s email confirmation. No QR yet, not earning, not on the legend yet. |
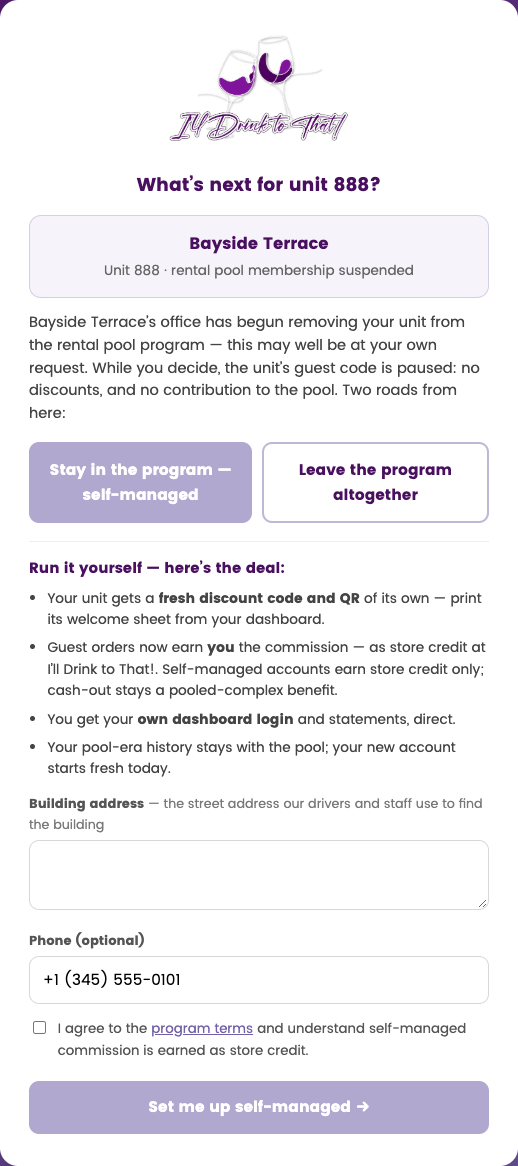
| Suspended | A removal is in progress: discounts and pool contribution are paused while the owner decides. Re-send the form or cancel at any time. |
Every page of this site carries a small bot in the bottom-right corner. Tap it and ask a question in your own words — it is fully trained on this programme and can answer anything about how it works: what your commission is and when it lands, how to add or remove a unit, how to print a unit's welcome sheet, what your guests get, what your owners can see, how joining or leaving a pool works, what happens to a unit when it is sold. If a question has an answer anywhere in this guide, the assistant knows it.
It points you at the right screen, too. Answers include working links, so “where do I register an owner?” comes back with the steps and a link that opens the page — you never have to hunt for the button being described.
Prefer to talk? Press the microphone and simply speak your question; it types itself out and sends when you finish. The speaker button in the panel’s header will read answers back aloud if you want them — it stays off until you switch it on.
If it can’t help, a person will. Under the chat there is “Ask us to get back to you” — leave your name, email and question and it reaches our team directly, who will reply by email.
Pre-ordering at the time of booking. We’re working on connecting our store to the booking systems complexes already use. Once a guest confirms their stay with you, they’ll be able to browse our range and place an order in advance — without leaving the booking process.
Their order is then delivered to the unit for their arrival, so the fridge is stocked before they walk through the door — no shopping trip on day one of the holiday.
Questions about your account, a transaction, or anything on the dashboard? Contact the I'll Drink To That! team and we'll be glad to help.